Showing posts with label The Family Table--Recipes. Show all posts

Thursday, January 18, 2018

Sous Vide Egg Bites

I made my 3rd meal in the Instant Pot today. Everyone raves about Sous Vide Egg Bites on the Instant Pot facebook page so I had to try them. They were a HUGE hit with my family. I'll be making these every Sunday from now on to keep in the fridge for breakfast throughout the week. You will need some 4 oz. jars. I got a dozen from Walmart for around $8.


Sous Vide Egg Bites:

4 large eggs
3 pieces of cooked bacon, crumbled
1/2 cup cottage cheese
1/2 cup sharp cheddar cheese
1/4 cup half & half
1/2 tsp salt
1/8 tsp black pepper
4 4 oz jars


Spray jars with cooking spray and divide crumbled bacon among them. 

Add all other ingredients to a blender and and blend for 5-10 seconds.

Pour egg mixture into each jar, dividing evenly. 

Cover the jars loosely with foil.

Add 1 cup to 1 1/2 cup of water to bottom of Instant Pot.

Set jars in Instant Pot.

Turn on the Steam Setting and set for 8 minutes. 

After the 8 minutes, then allow Instant Pot to Natural Release for 10 minutes.

Remove jars from Instant pot and allow to cool for 3-4 minutes.

Tip jar upside down on a plate for a few seconds to remove egg bite. 

Enjoy!


Experiment with different types of cheeses, sausage, ham, even veggies. 


Tuesday, January 16, 2018

Instant Pot Tomato Soup

I recieved an Instant Pot for Christmas. I made boiled eggs and then let it sit on the counter for about a week until I was brave enough to try making something. We have had some cold weather and snow this week so I decided to try a Tomato Soup recipe. It turned out great!


Start out by chopping up some carrots and yellow onions and cook using the Saute option.


Next add tomatoes and other ingredients and pressure cook for 5 minutes. 


After the pressure has released, use a blender to puree the soup and then add the half & half. 


Add some crusty cheese bread and enjoy on a cold day!

Recipe:

Instant Pot Tomato Soup

Ingredients:

1/4 cup olive oil
1 tsp of dried Basil
8 oz. chopped baby carrots
8 oz chopped yellow onion
1 cup of chicken broth
6 14.5 oz cans of diced tomatoes
1 tsp of salt
1 tsp of pepper
1 tbs parmesan cheese
1 tbs sugar
1 cup half & half

Using the saute feature, cook carrots, basil, and onions in the olive oil until the onions start to get soft and translucent. 
Add all remaining ingredients except half & half and use the Manual setting for 5 minutes and allow to Natural Release.
Use an immersion blender to puree soup and then add in half & half. 
Serve with your favorite Tomato Soup sides and toppings!

Note: We are not huge Basil fans. You can definitely add more if you are!


Friday, September 8, 2017

Amish Breakfast Casserole Recipe Added,

One of my favorite breakfast recipes is this Amish Breakfast Casserole. It can be mixed up and kept in the refrigerator overnight, ready to bake the next morning or even frozen until you are ready to pull it out and have an easy breakfast. This makes a great Christmas morning breakfast casserole. 


Ingredients:

1 pound of bacon, cooked and crumbled.
9 eggs, beaten
1 1/2 cups of shredded swiss cheese
2 1/2 cups of shredded cheddar cheese
2 cups of small curd cottage cheese (don't worry cottage cheese haters, you won't even know it's there!)
5 cups of frozen shredded hash browns
salt, and pepper

Directions: 

Combine all ingredients in a large bowl. If you you decide to refrigerate or freeze it you made need to mix it a little more just before cooking. Dump into a greased 9x13 pan and bake in a preheated 350 degree oven for approximately an hour or until set. Let cool 10 minutes before eating. 

My guests at The Lodge love it when I make my Zucchini Muffins and serve them with this Amish Breakfast Casserole.  So gather the family together around  the "family table" and everyone talk about their day and their dreams and goals and invite relatives over and pretend you are The Waltons .  It's a good thing as Martha Stewart would say...

Tuesday, July 4, 2017

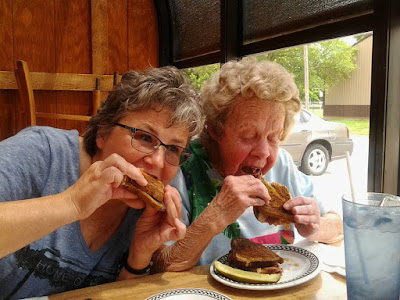
Aunt Alean and her favorite Reuben sandwiches

My Aunt Alean was such a special lady and my life has been enriched just by knowing her.  She is no longer with us and I miss her terribly.  I have so many good memories of time spent with her.  She loved her country music shows  and detective shows and I loved to pack my suitcase and go spend the weekend with her.  We would grab something to eat and head to her house to kick back and fix ourselves a coke float and watch her favorite shows.  Memories that I now have to treasure. After her husband died she moved back to her home town and we became close.  I liked to tell her she was an original Hicksie Chick and she would always be a Hicksie Chick cause she like us was born with the last name Hicks.   My only regret is that I didn't know her longer.


My sister took her out to eat one day where they ordered Reubens and she loved it!  Doesn't this bring a smile to your face?  Take time out of your busy lives to spend time with the older generation.  Aunt Alean was blessed with many who loved her and I am so thankful she got to spend time in her last days with the Hicksie Chick side of her family as well as the Mast side.  She was one special lady and I miss her daily!

Sunday, November 14, 2010

Grandma Lizzie's Mackerel Patties

As a little girl I have wonderful memories of going to dinner at my Grandma Lizzie and Grandpa Arts house in town. They lived at the top of what seemed like a very steep hill especially when trudging up it after swim lessons which I remember as being awfully early in the morning and always cold. I remember Grandma as being a good cook and I can still see her lifting a giant granite pan full of patties out of the oven.
Here's the recipe from my sister Carol for Grandma's patties:
For each can of Mackerel, Salmon or Tuna (which has been drained well and deboned) add 1 egg and crackers that have been crushed up very fine. Salt to taste. Mix well into patties and fry slowly in hot oil till brown.

Kick it up a notch by Granddaughter Joyce- Add green pepper, celery and onion and wrap a piece of bacon around each patty held in place with a toothpick. Then fry till brown.

Sister Carol assures me Grandma fried them so I can only think she must have put them in the oven to keep them warm until family arrived.

I also remember eating Sour Kraut with wieners, the most wonderful homemade rolls, Lemon Pies and another favorite was baked pie crust sprinkled with cinnamon and sugar. May have been during hard times but I remember the food tasting wonderful!

Friday, June 18, 2010

Mom's biscuits...easiest biscuit recipe in the world!

Don't these look great? And they taste delicious especially with butter or honey dripping off them. This is my moms recipe and she had 8 kids so anything that was fast was king.
The two most important things to remember here are self-rising flour and a cast iron skillet. Can't go wrong if you have those two items. Here's the recipe:

Mix together self-rising flour and pour in milk and stir until you have the consistency you need to drop them from a spoon. Heat your oil up in the cast iron skillet. Drop your biscuit mix into the oil and then flip the biscuits over . Keep adding dough until the pan is full. Pop into the oven and there you go! How easy was that? Bake on 375 until you can tell they are done. Should slide right out of the skillet when you turn them over on a plate. Serve while hot!

Saturday, February 27, 2010

Beef and Noodles

Here's a great recipe for beef and noodles that is quick and easy to fix. I first fry up my hamburger and drain it. Left over roast beef also tastes great in this meal. Then I heat up my water to boiling and when it is the correct temp as stated on the directions the noodles came in, I dump in my noodles . Egg noodles are best but Amish noodles also are great. My directions said to cook for 18 minutes. Drain.

While the noodles are boiling, combine a can of cream of mushroom soup, 3 cans of water, 1 package of dry onion soup mix, one can of brown gravy or whatever you have, and a small container of sour cream. Salt to taste.

Combine noodles, sauce mix and drained hamburger and stir everything together. Pour into a baking pan and bake in the oven on 325 for about 40 minutes. Or place in the frig overnight and let all the flavors marinate together.

Enjoy!

Monday, February 15, 2010

The best tasting vegetable soup ever!

I've got the day off and it's starting to snow so there's no better time than now to make a great tasting pot of vegetable soup! Some day I think I will make up my own cookbook with all my favorite recipes in it. And in this day of digital photos I can add pictures!
First, get out the biggest crock pot you have and look in your frig and drag anything out that would go in a soup. This is a great time to use up any leftovers you might have. I had cabbage, broccoli, cauliflower, green peppers, red peppers, onions both green and red. And of course every good soup starts with a bottle of Spicy V-8 juice!
Fry up some hamburger and let it drain. Another great meat to use is sausage if you like your soup with a little more kick.

Put all these chopped ingredients into your crock pot and turn it on low. Unless you don't have enough time to slow cook it and then you can turn it up on a higher setting. It just needs to heat to combine all the flavors cause all the meat is already cooked.

In today's soup I added some smoked sausage links cause I had them and they add an additional flavor. You can leave them out if you like.

And remember all that ketchup I made during the summer. I really didn't care for the flavor for ketchup but it makes a great soup starter base. So I added a pint of that. Here you can add tomatoes instead. And homemade tomatoes are always the best. But, O.K if you must, you can add ones you bought at the grocery store!

Now it's time to add the drained hamburger. I always salt my hamburger when it is cooking.

And I almost forgot. Add celery if you have it. Unfortunately, I was out of carrots but don't forget them too.
And always have a scrap bowl handy to put the parts in that the chickens love! Always taking care of my "little flock". They will appreciate it especially this time of year when snow is covering the ground and they don't see much green anywhere.

Now isn't that looking very colorful?

Now's the time to add whatever you don't have fresh to put in. I'm adding canned corn and canned green beans. Some people also like the flavor of frozen best so whichever you prefer will be great. Drain them first cause you don't need any excess salt.

Taste first and then add whatever spices you like. I added salt and sometimes I add SeasonAll or Garlic Salt. Put the lid back on and let simmer. Serve with a salad and homemade bread and you have a meal that can't be beat!

And don't forget to take your bowl of scraps to your little feathered friends.

And now you are free to sit back where you can watch the falling snow and read a good book! Life is short so enjoy the little things as much as possible.

Monday, February 1, 2010

Pizza from Scratch! Don't buy it-Make it!

My daughter and her husband got back from their buying trip to the city just in time for homemade pizza. Sometimes I wonder why we go to all the expense of buying pizza when it is much easier and more healthy to make your own. Unless you live in the city where there is delivery and then that might make a difference. But out here in the "boonies" those pizza delivery people couldn't be paid enough to brave the muddy, or snow bound roads just to deliver a pizza. So we make our own!
First I dig out this giant pan that I bought at a flea market one day. It's industrial size. I seem to be buying more industrial size pans in my old age for some reason. And my daughter who usually rolls her eyes around in her head at most things I do and say, was quick to claim this pan "when I'm dead" as she puts it. Geez!

And it makes a large enough pizza that there is even left overs for lunch the next day.

O.K. so back to how to make this pizza. Preheat your oven to 475 degrees. First I buy several packages of those pizza crust packages that all you have to do is add hot water. I used three of them for a pan this size. Then you stir the dough till mixed and let sit for 5 minutes. I had previously fried my hamburger but you could use sausage or chicken or whatever you heart desires. (But let's pass on the chicken for a while, shall we?)
Bake the crust for 11 minutes or whatever it says on the package. Then take it out, spread your favorite pizza sauce over the partially baked crust, add your red and green chopped peppers, chopped onions, black olives, pepperoni, hamburger, and whatever else you fancy throwing on there. The more the better is my thinking!
And oh yes, I always like to leave one end with nothing but cheese for those who are picky eaters and every family has them. You know who you are!
I heat this up for about 8 minutes or so and then pull the pan back out and add both shredded cheddar cheese and shredded mozzarella cheese. Pop it back in the oven again until the cheese melts and there it is!!! Comfort food guaranteed to make all your troubles be forgotten!

Friday, January 15, 2010

7 Layer Dip

I had forgotten how easy it is to throw this dish together for a quick snack when company drops in. This may not be the official recipe but here's how I make it. If I don' t have something, I just leave it out and go on. Or throw something extra in that everyone likes.
First spread the bottom layer with refried beans. Then combine a 16 oz carton of sour cream with a packet of taco seasoning mix. I think the original recipe calls for 1/3 cup mayonnaise but I didn't have any so left it out. Stir this mixture together and spread evenly on the refried beans.
Add a layer of guacamole dip.
Then add tomatoes, chopped green onions, olives, shredded cheese, and heck, throw in the kitchen sink if you want to. (That just means anything else you like for those of you like my daughter that don't understand my lingo)
I like to serve with those cute little tortilla chips that are like little cups so you can actually get a decent amount in them.
Oh wait, I just realized I didn't add any salsa anywhere. So throw some of that on too if you like it. Home made is always good.
I put this in a 9 x 13 but it looks really good in a round, flat platter also. Little more decorative!
Good food, good friends equals good times!

Saturday, December 26, 2009

Joyce's Enchiladas!

I made enchiladas for Christmas supper and Kevin's family and Rachel's family came over. Kevin was home sick so hope he gets to feeling better soon! Below is my recipe.

I mixed the sauce up the night before and also browned my hamburger, drained it and then mixed in some Taco seasoning mix to taste. You'll find I cook by taste so some people (like my roll your eyes around daughter) have a hard time following some of my recipes.

Take one container of sour cream, one can of cream of mushroom soup and 1 can of water and put in pan on low. Stir to keep from burning. Add Ro-Tel or your own homemade Salsa to taste. Some people like it hotter than others. If this seems too thick, just add more water. If I am making a large pan or more than one pan, I will double this recipe. You can always keep the leftover sauce in the frig for later.

Heat up a couple cans of refried beans, and warm the large tortilla shells. Set aside. Get out shredded cheese and open a can of olives. Olives will be used later but might as well open the can the same time you open the refried beans.

Put a couple spoonfuls of warm refried beans spread evenly in the center of the flat tortilla shell. Spoon on some hamburger, top with shredded cheese. Roll up the tortilla shell and place in 9 x 13 pan.

When the pan is full, slowly pour your enchilada sauce over the top. Slip a spatula under the tortilla mixture so some of the sauce will be under the pan. Or pour some of the sauce in the pan to start with before adding the filled tortillas. You don't want anything to burn.


Slice your olives over the top and then sprinkle with shredded cheese of your choice.

Everything has been cooked, so what you are doing is combining the flavors and heating the dish. So cook slowly on about a 275 degree oven watching carefully that the cheese just melts and doesn't overcook. Can turn the oven down if it looks like it is getting too hot.

We serve with a salad and cottage cheese.

Enjoy!

Friday, December 25, 2009

The Best Amish Breakfast Casserole Ever!


This was the best breakfast casserole you can imagine. Below is the recipe. Give it a try!
Amish Breakfast Casserole
1 lb. bacon diced
1 med. chopped sweet onion
6 eggs, lightly beaten
4 cups frozen, shredded hash browns potatoes, thawed
2 cups shredded cheddar cheese
1 1/2 cups small curd cottage cheese
1 1/4 cups shredded swiss cheese
In a large skillet, cook bacon and onion until bacon is crisp, drain. In a bowl, combine the remaining ingredients ; stir in bacon mixture. Transfer to a greased 9 x 13 pan. Bake uncovered at 350 degrees for 35 to 40 minutes or until set and bubbly. Let stand for 10 minutes before cutting.
I think Rachel made it up the night before and let it sit overnight in the frig. I think if you do that you must allow a pre-heating time as your pan would be cold and would take longer to warm up before cooking.

Sunday, December 6, 2009

Annual Tea Party

It's time to once again dig out my favorite gold silverware... I don't know why I only use it a couple times a year. It is so pretty.


And set the table for the annual grand-daughter's tea party. They each invite one of their best friends and dress up cause this day is special...

For snacks this year I tried out some new recipes. A couple anyway. First, is baked pecans and dried cranberries which I thought looked beautiful for this season. And the colors still match my pink theme.
Then I made "Poor Man's Turtles" which consist of placing a small twisted pretzel on a baking sheet and then placing one Rolo candy bar on top of that and baking on a 200 degree oven for about 5 minutes. Take them out and top each one with a pecan and push gently down. Think the kids will love them.
My daughter showed me how to take olives and make little penguins out of them but to save time I just put two pieces of olives on top of a square of cheddar cheese and stuck a toothpick through it all. Little penguins were cute but we'll save them for another day. Maybe for the little boys party.
And I am going to wrap hot dogs and cheese in Crescent Rolls and make pigs in blankets.

We have a bowl of grapes in an antique bowl..
a dish of miniature pickles..

and of course I'll make raspberry punch in my beautiful antique punch bowl.

My daughter in law Jennifer is in charge of the program and she always does a great job.

Our hopes are that these little girls will remember our tea parties all their lives. And it gives us as adults and mothers and grandmothers a chance to speak blessings over each of them.

The table is set, and now it is time to get ready to head off to church....

Soon the party will begin....

Sunday, April 19, 2009

Rachel's Focaccia Bread Recipe...

This was the best sandwich I have ever eaten. Here's her recipe.

Ingredients:
Water 80 degrees, 1 cup
Olive Oil 1/3 cup
Sugar 2 tsp.
Salt 1 and 1/2 tsp.
Bread Flour 3 cups
Dried Italian Seasoning 1 tsp.
Active Dry Yeast 2 tsp

Select Pizza dough cycle on your bread machine.

With oiled hands, evenly press dough into a greased 9 x 13 pan. Using your fingertips, make indentations in the dough.

Cover, let rise in a warm place for 20 minutes or until doubled in size.

Brush bread with olive oil and sprinkle with kosher salt and rosemary.

Bake at 400 degrees for 20 minutes or until golden brown.

Let cool and slice into sandwich sizes. Fill with your favorite filling.

Rachel's Sandwich Filling:

Chicken from Deli
Cooked Bacon
Provolone Cheese

Layer inside bread and toast in oven till cheese has melted.

Saturday, April 26, 2008

Chocolate Gravy like mom's...


I have a friend Noel who emailed me a recipe for Chocolate Gravy that her aunt use to make when she was growing up. I got up this morning and decided it would be a good day to try it out and see if it tastes like the gravy my mom use to make. It was wonderful. I also made homemade biscuits to go with it. Sure brought back memories of getting up on Saturday mornings as a little girl to the aroma of homemade biscuits baking in the oven and mom stirring up chocolate gravy in the cast iron skillet. By the way, nothing cooks better than cast iron skillets, so if you don't have any, you should hit your local flea market or antique store and buy yourself one!

Chocolate Gravy:

3/4 cup sugar
2 Tab. cocoa
Mix together (add more or less chocolate, according to how dark you like your chocolate)
2 Tab. (level) flour or corn starch
1 1/2 cups water

Mix the water in dry mixture slowly so it will not lump.
Cook over medium heat until thickened. Serve over hot biscuits with butter.